 Kia Sportage: Power Door Lock Actuators: Repair procedures
Third generation SL (2010–2016) / Kia Sportage SL Service & Repair Manual / Body Electrical System / Power Door Locks / Power Door Lock Actuators: Repair procedures
| Inspection |
Front Door Lock Actuator
| 1. |
Remove the front door trim.
(Refer to the BD group - "Front door") |
| 2. |
Remove the front door module.
(Refer to the BD group - "Front door") |
| 3. |
Disconnect the connectors from the actuator.
|

| 4. |
Check actuator operation by connecting power and ground
according to the table. To prevent damage to the actuator, apply battery
voltage only momentarily.
[Central Lock]
[Double Lock]
|


Rear Door Lock Actuator
| 1. |
Remove the rear door trim.
(Refer to the BD group - "Rear door") |
| 2. |
Remove the rear door module.
(Refer to the BD group - "Rear door") |
| 3. |
Disconnect the connectors from the actuator.
|

| 4. |
Check actuator operation by connecting power and ground
according to the table. To prevent damage to the actuator, apply battery
voltage only momentarily.
[Central Lock]
[Double Lock]
|


Tailgate Lock Actuator Inspection
| 1. |
Remove the tailgate trim.
(Refer to the BD group - "Tailgate") |
| 2. |
Disconnect the 4P connector from the actuator.
|

| 3. |
Check actuator operation by connecting power and ground
according to the table. To prevent damage to the actuator, apply battery
voltage only momentarily.
|
Front Door Lock Switch
| 1. |
Remove the front door trim.
(Refer to the BD group - "Front door") |
| 2. |
Remove the front door module.
(Refer to the BD group - "Front door") |
| 3. |
Disconnect the connectors from the actuator.
|
| 4. |
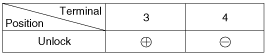
Check for continuity between the terminals in each switch position when inserting the key into the door according to the table.
[Central Lock]
[Double Lock]
|


Rear Door Lock Switch
| 1. |
Remove the rear door trim.
(Refer to the BD group - "Rear door") |
| 2. |
Remove the rear door module.
(Refer to the BD group - "Rear door") |
| 3. |
Disconnect the connectors from the actuator.
|
| 4. |
Check for continuity between the terminals in each switch position according to the table.
[Central Lock]
|

Tailgate Switch
| 1. |
Remove the tailgate trim.
(Refer to the BD group - "Tailgate") |
| 2. |
Disconnect the 4P connector from the actuator.
|
| 3. |
Check for continuity between the terminals in each switch position according to the table.
|

 Components and Components Location
Component Location
1. Driver power window switch2. Assist power window switch3. SJB (Smart Junction Box)4. Door lock switch5. Tailgate lock actuator & switch6. Front door lock actuator & ...
 Power Door Lock Switch: Repair procedures
Inspection
Driver Power Door Lock Switch
1.
Disconnect the negative battery terminal.
2.
Remove the front door trim.
(Refer to the BD group - "Front door")
3.
Disconnect the switch conne ...
Other Information:
Parking Brake Assembly: Repair procedures
Removal
Parking Brake Pedal [Foot type]
1.
Remove the crash pad lower panel and reinforcement panel. (Refer to the Body group-crash pad)
2.
Remove the junction box. (Refer to the Body Electri ...
Use high quality ethylene glycol coolant
Your vehicle is delivered with high quality ethylene glycol coolant in the cooling
system. It is the only type of coolant that should be used because it helps prevent
corrosion in the cooling syst ...
Categories
- Home
- Kia Sportage QL (2015-2019) Owners Manual
- Kia Sportage QL (2015-2019) Service Manual
- Kia Sportage SL 2010-2016 Owners Manual
- Kia Sportage SL 2010-2016 Service Manual
Copyright © www.kispmanual.com 2014-2025