 Kia Sportage: Turn Signal Lamp: Repair procedures
Third generation SL (2010–2016) / Kia Sportage SL Service & Repair Manual / Body Electrical System / Lighting System / Turn Signal Lamp: Repair procedures
| Removal |
Rear Turn Signal Lamp
| 1. |
Disconnect the negative (-) battery terminal. |
| 2. |
Remove the rear bumper.
(Refer to BD group - "Rear Bumper") |
| 3. |
Disconnect the connector. Remove the rear turn signal lamp (A) after loosening 5 screws.
|
| 4. |
Replace the bulb (A) of rear turn signal lamp.
? If replacing the bulb only, you could work it without removing the rear bumper. |
Door Mirror Turn Signal Lamp
| 1. |
Disconnect the negative (-) battery terminal. |
| 2. |
Remove the mirror from the mirror holder.
Be careful not to damage to the clip. |
| 3. |
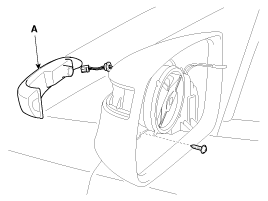
Remove the door mirror turn signal lamp (A) after disassembling screw and connector.
|
| Installation |
Rear Turn Signal Lamp
| 1. |
Install the bulb to the rear turn signal lamp assembly. |
| 2. |
Install the rear turn signal lamp to the rear bumper. |
Door Mirror Turn Signal Lamp
| 1. |
Install the door mirror turn signal lamp to the door mirror. |
| 2. |
Install the door mirror. |
| 3. |
Connect the battery terminal (-). |
 Head Lamps: Repair procedures
Removal
Head lamps become very hot during use; do not touch them or any attaching hardware immediately after they have been turned off.
...
 Room Lamp: Repair procedures
Inspection
1.
Remove the room lamp assembly connector then check for continuity between terminals.
Removal
1.
Disconnect the negative (-) battery terminal.
2.
Detach the lamp lens (A) fro ...
Other Information:
Electric Waste Gate Actuator (EWGA): Description and Operation
Desrcription
The Electric WGT Control Actuator is installed on the turbocharger.
It operates the vain in the Waste Gate Turbocharger (WGT) and
regulates the compressed air amount by the ECM''s P ...
Climate Control Air Filter: Repair procedures
Replacement
1.
Disconnect the damper (B) and glove box lift (C) from the glove box (A).
2.
Remove the filter cover with pushing the knob.
3.
Replace the air filter (B), install it after ma ...
Categories
- Home
- Kia Sportage QL (2015-2019) Owners Manual
- Kia Sportage QL (2015-2019) Service Manual
- Kia Sportage SL 2010-2016 Owners Manual
- Kia Sportage SL 2010-2016 Service Manual
Copyright © www.kispmanual.com 2014-2024


